Answer the questions with whatever options you want to use for the export
Converted markdown is in the output directory
Start SvelteKit project
npm init svelte@next <project-name>
cd <project-name>
npm install to install dependencies
Ended up moving away from SvelteKit for two reasons.
It doesn’t have the robust responsive image generation that Gatsby has with Gatsby-Image. This means I either do without or do that work manually… or build my own solution to do it. Those are compromises I don’t want to make or that take more time.
It doesn’t generate pages properly from a symlinked directory. For some reason, when I created a symlink of my content directory and moved that over to the SvelteKit project, I was getting 500 errors when trying to visit any of the generated pages. If I moved them instead, the pages were fine. I really want to be able to keep all my blog’s content in my Obsidian Vault. I could symlink in the other direction (include the symlink in the Obsidian Vault), but Obsidian doesn’t support this officially. I’m afraid it would cause problem with syncing. Gatsby seems to work just fine, even if the content is symlinked.
The Decision
Gatsby is kinda old and boring now, but I still picked it. The newest, shiniest tech isn’t always the best. Gatsby is best for me right now for a number of reasons. Some are specific to me and some to the project. I’ll share these to help you understand how I select the tech for a project and how you might think about tech for your own projects.
It works with symlinks which allows me to edit my posts in Obsidian.
Gatsby has a huge developer ecosystem. That means, I get lots of functionality just by downloading plugins. One example is the Gatsby-Image plugin which makes responsive images automatic. That’s less work for me on stuff that software can do instead… but I also don’t even have to write the software because someone else did!
That same developer ecosystem means I’ll be able to get support relatively easily. New tech is sexy, but not as many people are using it. This means that, when you ask a question, you may never get an answer. The more people there are working with the tech, the more likely you can get help when you need it. If you’re lucky, you might find a blog post out that answers your questions without your having to ask.
I’ve already used Gatsby for another project, so it takes me less time to get up to speed. Sometimes you want to try something new just to get the experience. When your focus is on getting work done, though, it’s best to work with what you already know.
I considered and even auditioned a few different options.
Svelte
I love Svelte because it compiles down to regular HTML and Javascript. That makes everything light weight and performant. This might have been my first choice if not for a couple of issues.
SvelteKit, the app framework that I would have used for a quicker start, is still very early. That means the API could change and I could have to do a lot of work to migrate to version 1.0. That also means there aren’t many tutorials, blogs, or people to help with it.
Svelte doesn’t have the volume of libraries that Gatsby and React do. (Gatsby is built on React, by the way.) That means I’ll have to write more code to get some things done that I would with Gatsby.
Nuxt
I love working in Vue, so Nuxt seemed like a good option. It’s an app framework for Vue.
Since Nuxt is an app framework, it’s not specifically for static sites. That means there’s a bit more configuration and work to get a static site going. Since Gatsby is a static site generator, it assumes that’s what you want to do from the get-go.
It doesn’t offer the performance advantages of Svelte. The site built in Nuxt would likely be more similar in weight and performance to the Gatsby site. Even though I prefer Vue to React, it’s a weak preference. Without a performance benefit, I’m not willing to do a fair bit of extra work just so I can write in Vue.
Others
I looked at a few others, but they weren’t great fits for one reason or another. Several were in languages I’m not very familiar with (like Hugo). I’ll learn from this project, but my primary goal is to get the site moved over. I’m not looking at this as a learning project.
Start Gatsby project
npm init gatsby
Switch into the project directory
Build the Gatsby site
RadDevon.com Gatsby site build
Edit the gatsby-config.js File
Set the title and URL- I might come back and set a different URL to test the site on a sub-domain, but I’ll put in the real domain for now. That may or may not even be necessary.
Add some plugins for the markdown, adding to the document <head>, and to expose filesystem instance names in GraphQL.
module.exports = {siteMetadata: {title: `Rad Devon`, siteUrl: `https://www.raddevon.com/`,},plugins: [ `gatsby-plugin-react-helmet`, `gatsby-plugin-mdx-source-name`, { resolve: `gatsby-source-filesystem`, options: { name: `posts`, path: `${__dirname}/src/posts/`, }, }, { resolve: `gatsby-plugin-mdx`, options: { extensions: ['.mdx', '.md'], }, },],}; ```# Install Some PluginsI'd generally do this first, but since I was already in the config, I figured I'd configure before installation. Use this command to install: ```bashnpm install --save-dev gatsby-plugin-mdx gatsby-plugin-mdx-source-name
Here are the plugins I’ve configured so far:
gatsby-plugin-react-helmet- This lets me add to the head of my document. This will let me set the title and any meta tags I need to set. This was already installed, so I just need to add it to gatsby-config.js to tell Gatsby to use it.
gatsby-plugin-mdx-source-name- This adds the file source’s name (like posts in the filesystem config you see above) to the GraphQL data for the MDX source. This lets me have multiple MDX sources and query them independently by filtering on that name. I’ll show how that works soon.
gatsby-source-filesystem- This one looks different from the others. If you just want to tell Gatsby to use a plugin, you can add a string with the plugin’s name to the plugins array (like the previous two). If you need to add options, you’ll add an object to the plugins array instead with the string name as the value of the resolve key. You then add a nested options object containing any options. In this case, we need to tell the filesystem source plugin where to look and what the name of this source is.
gatsby-plugin-mdx- This takes markdown files from my source and exposes their data via GraphQL. That will let me query and make pages from them. If I only wanted it to process .mdx files, I wouldn’t need the options, but my posts are in .md format. That’s going to require me to pass the extensions option and tell the plugin to expose data for both .mdx and .md files.
Set Up the Article Page
I’m going to use File System Route API to create programmatic routes for each article at a path that mirrors that of my development file system. Anything inside src/pages will be mirrored in the routes. I want the articles at /articles, so I first create an articles directory inside src/pages. Then, to do the programatic part, I’ll create within articles a file {mdx.slug}.js. That tells the Gatsby to query mds and create an individual route for each resulting object’s slug property.
Here’s what the file looks like:
import React from 'react';import { MDXRenderer } from 'gatsby-plugin-mdx';import { Helmet } from 'react-helmet';import { graphql } from 'gatsby';export default function Article({ data, params }) { const article = data.mdx; return ( <> <Helmet> <title>{article.frontmatter.title}</title> </Helmet> <main> <h1>{article.frontmatter.title}</h1> <MDXRenderer>{article.body}</MDXRenderer> </main> </> );}export const query = graphql` query ArticleBySlug($slug: String) { mdx(slug: { eq: $slug }, fields: { source: { eq: "articles" } }) { id slug body frontmatter { date title } } }`;
Now, I’ll briefly explain what it does. I’m importing some of the libraries I installed. MDXRenderer is used to render the body of the article. Helmet is used to set the title of the page to the article’s title. graphql is required to query for the articles.
Note that, not only am I querying by the slug for the article, but I’m also filtering this for source fields containing "articles". This uses the data added to the MDX source by gatsby-plugin-mdx-source-name to limit creation of these pages to only articles. This is important since I have both my WordPress pages and my WordPress posts (which I refer to as “articles”) in markdown format. I don’t want both of these buckets of content suddenly tossed into the articles route with this new site.
This isn’t a final template. The idea is to generate a basic page with the content so I can see that it’s working. I’ll refine it later and SEO it up.
I can now run npm run develop to start the Gatsby development server and navigate to http://localhost:8000/articles/\<any-article-slug> to see one of my articles rendered on the Gatsby site. Here’s what one looks like:
This looks like a mess, but that’s to be expected at this point. First, I don’t have any styling in place. Second, none of the images are exposed to Gatsby yet. Third, WordPress replaces emojis with images of the emojis hosted on their servers. That’s the only image that’s working because it’s referencing the path to that emoji hosted by WordPress themselves. That’s why you’re seeing one broken image and the one giant emoji image.
Get Images Working
I found a page on the Gatsby documentation that explains how to use images with markdown. It tells how to configure feature images defined in frontmatter and inline images. I use both of these in my posts, so this should tell me everything I need.
I already have most of the image plugins installed because of the options I chose during the initialization, but I need to add the plugin for inline images in my markdown. I’ll do that with this command:
npm install --save-dev gatsby-remark-images
I need to jump back into gatsby-config.js to set all this up. I’ll add gatsby-plugin-image, gatsby-plugin-sharp, gatsby-transformer-sharp, and gatsby-remark-images to the plugins array. I also need to configure gatsby-remark-images for the MDX plugin inside that plugin’s object.
The existing filesystem source should already encompass the images since the WordPress to markdown converter placed the images in an images directory under each post’s directory. The image plugins will pick those up automatically since I’ve already told Gatsby about that directory.
That should handle inline images, but I still have some work to do to get the frontmatter images working. Looking at the markdown files, I’m noticing the full paths of those images are not referenced in the frontmatter.
---title: "5 Reasons Your Web Dev Salary Will Be Lower Than You Expected"date: "2021-09-11"tags: - "career"coverImage: "5-reasons-low-salary-thumb.jpg"---…
The image referenced there as the coverImage is actually at ./images/5-reasons-low-salary-thumb.jpg. (That’s an images directory within the post’s directory containing that image.)
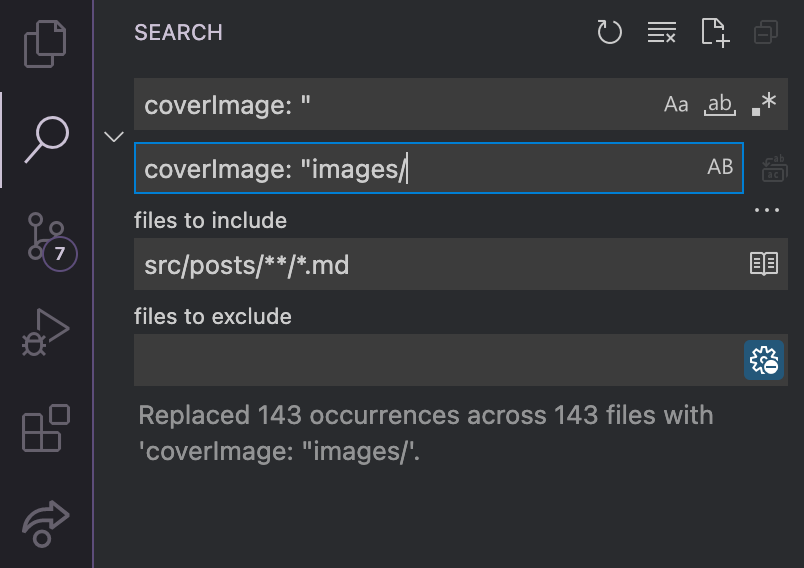
Since all of them follow this same convention, I can do a simple global find/replace in all of my articles’ markdown files to update the references. I’m using Visual Studio Code as my editor, so I can using the project-wide search tool to globally replace the cover image paths. I’ll set the “files to include” so that it’s only replacing in my articles. Then I’ll set the search and the replacement and click “Replace all.” (That’s the button just right of the replacement field.)
Now, I’m ready to hook up my cover images. This is addressed in the “Querying for images from Frontmatter” section of the documentation page I linked you to earlier. I’ll start by adding the GraphQL query to my article template at src/pages/articles/{mdx.slug}.js. I’ve already got a query going to get the rest of the data, so the updated query including the cover image looks like this:
The syntax is a bit different because I’m using the image plugin instead of sharp. If you use sharp, the development server logs this warning:
warn [gatsby-transformer-sharp] The "fixed" and "fluid" resolvers are now deprecated. Switch to "gatsby-plugin-image" for better performance and a simpler API. See https://gatsby.dev/migrate-images to
learn how.
The last step for the cover image is to add it to the article template. I need to import the image plugin:
import { GatsbyImage } from 'gatsby-plugin-image';
I’ll tuck the image between the H1 header and the content of the article, like this:
Both the cover image and the inline images are now working, but you can probably see a problem already. On my WordPress site, I didn’t use a template that automatically included the cover images. That means, I’ve also included another copy of each of the cover images inline. That’s probably not what I want, so I’m actually going to take that image out of the template. I’ll leave it in the query for now because I’m going to want to use that image in some of my SEO meta tags and social media tags.
Embedded Videos
Here’s what an article looks like with a video:
It has a link to a video, but that’s not very helpful. I want the video to be embedded in the article. I looked at a few plugins that would help with this. gatsby-remark-youtube would be a decent solution, but it requires a special syntax that I’m likely to forget. In WordPress, I was able to just paste in the YouTube URL, and it would take care of the rest.
To get as close as I can to that same workflow, I’d like to use gatsby-remark-embedder. It has the added benefit of supporting embeds from other sites including CodePen which I also use in some of my articles. It lets me write custom processors to handle other URLs. I’d like to eventually migrate my videos over to PeerTube and custom processors would allow me to write my own processor for those URLs too.
Only trouble is, it doesn’t support Gatsby 4 (which is the version I’m using to build my site). When I try to install it, NPM complains that I don’t meet the peer dependency on Gatsby 3.x. That sucks because this one would otherwise be perfect. I did notice in that issue I linked to above someone has submitted a pull request to make the plugin compatible with Gatsby 4. It hasn’t been merged yet, but it doesn’t look like that’s because it’s a bad pull request. It looks like the project may just have been abandoned. (The last release was in April, and that one only brought Gatsby 3 compatibility.)
I search on NPM in hopes that maybe someone has published a Gatsby 4 compatible fork of gatsby-remark-embedder. Sure enough, I found a package published by the contributor who submitted the Gatsby 4 pull request over on GitHub. I have a hunch this might be the Gatsby 4 version. I install it with npm i @trevorblades/gatsby-remark-embedder, and NPM doesn’t complain about my Gatsby version. Seems like we might be in business!
I need to add this plugin to my configuration. I can’t do it exactly the way that’s prescribed in the readme since the name of this package is going to be different from the canonical gatsby-remark-embedder plugin. Here’s what my gatsby-config.js is going to look like after the configuration:
You can see the new plugin inside the gatsbyRemarkPlugins array. I don’t have any additional configuration to add right now, but I’m adding it as a dictionary because I may end up adding an options dictionary with a custom transformer or two before I’m done.
Since the YouTube URLs in my articles are inline as text, the markdown converter has helpfully escaped any underscores in those URLs. That’s helpful in most cases for text in markdown, but it’s going to break these URLs by adding a backslash that doesn’t belong. I’ll have to search all these out and fix them. Here’s what one looks like before:
https://youtu.be/\_g\_pEwRzMko
and after the fix:
https://youtu.be/_g_pEwRzMko
I might be able to automate this fix, but it’s not worth it. There are just about a dozen with this particular problem, so I’ll find them and fix them manually.
With all those hoops jumped, the YouTube embeds are now working:
The aspect ratio is a problem, but I’ll save that for later. My goal now is to get all the content in.
Making Shortcodes Work (Sorta)
Previous Version
The other issue you can see in the image above, besides the incorrect aspect ratio, is just below the video.
This is a shortcode. If you’re familiar with WordPress, you probably understand what that means and can skip the rest of this paragraph. The plugin will replace them when the post is rendered with some other content.
The shortcode is for a plugin called Thrive Leads that makes it easy to make forms. It connects up to my email service provider (Drip) so that anyone who fills the form is added to my email list. I have created different forms within Thrive Leads for different offers. I add a form to each article so readers always have a way to “level up” their connection with me. I try to make that offer helpful to most people who would be reading that article.
I’m probably going to lose my quick form builder in the move from WordPress. I’ve seen services that offer something similar for Gatsby, but those are separate services that charge subscription fees. I’m looking to remove those kinds of external dependencies where I can, and it’s not worth breaking with that principal here.
Instead, I can manually build React form components for these Thrive forms. If I identify the components using the same IDs the Thrive forms had on WordPress, I can use the existing short codes to look up the correct forms and place them on the pages.
In order to do any of this, though, I’m going to need a way to replace the shortcodes with something else. Since MDX supports Remark plugins, a Remark transformer plugin seems like a great tool for that job.
I’m following an article in Gatsby’s docs on how to create a Remark transformer plugin. I’ll start by creating a plugins directory in my site. They don’t specify where, so I assume they want it at the root of the project. (Ultimately, it doesn’t matter, but I want to follow the tutorial pretty closely.) I’ll do it from my Mac’s command line with mkdir plugins from the root. The, I’ll switch into that directory via cd plugins.
They don’t say to create a nested directory inside that for this specific plugin, but I think that was their intent. I’ll go ahead and do that with mkdir gatsby-remark-wp-style-shortcodes and change into that with cd gatsby-remark-wp-style-shortcodes.
They want a package.json here which I can get by running npm init and answering the project initiation question. I’m going to stick with the defaults for all of the answers in the questionnaire. I’m not sure I’ll ever split this plugin out and distribute it apart from the site, but if I do, I can always edit the package.json by hand to make any changes I need. That gets me up and running quickly. Once all the questions are answered, I’ll type yes to generate the package.json.
I need a place for my code. That’s going to be a file named index.js inside this new plugin directory. I’ll rip some starter code straight out of the documentation page:
The markdownAST key I’m destructuring out of the first argument is an object representing the markdown document (the abstract syntax tree). That’s what I will traverse to find all of the shortcodes. pluginOptions contains any options that are set in the gatsby-config.js. (If you recall, I have to configure any Remark plugins inside the gatsby-config.js just like I did before with the embedder plugin.)
Gatsby recommends installing unist-util-visit to traverse the AST. Unfortunately, it isn’t quite that simple. The latest version of this package is an ESM module, meaning it can only be brought into your project via import. That’s fine, but my project is a CommonJS project since that’s what Gatsby boostrapped for me. That means I import things with require instead. I could change my project, but that breaks everything I already have and I’m not interested in wasting time figuring out why. Instead, I’ll just use an older version of this package that supports CommonJS. I’m sure it will have all the features I need.
I’ll do that with npm install --save unist-util-visit@2.0.3 inside this plugin’s directory. 2.0.3 is the latest version that I then need to import it inside index.js. Then I need to add this at the top of my plugin’s index.js:
const visit = require('unist-util-visit');
and I’ll copy/paste the usage example out of the article, but I’ll go ahead and modify it to traverse for text nodes since I know that’s what I’ll need to look for. Here’s what the whole file looks like now:
I want to take a quick detour to look at one of the shortcodes in an article’s source to make sure I know what I’m dealing with. Here’s what the one pictured above look like in markdown:
\[thrive_2step id='1528'\] Get a Free Mentoring Session! \[/thrive_2step\]
The shortcodes are actually escaped. I’d prefer I wouldn’t have to escape them like that in the document to use them, but I’m not sure how these will look in the AST. Will they be naked (without escaping), or will the escaping be left in? Before I commit to removing those from the markdown, I’m going to have the get the plugin to the point that it’s ready to find the shortcodes, split out the name of the shortcode, and parse any arguments (like the id='1528' in the example above) into an object (like {id: '1528'}). To start, I’ll just log out those values so I can see what it looks like in the AST. I could start more simply by just logging out all the text nodes to see what they look like, but it would be a lot of output since I have so much content. If filtering down to only the shortcodes fails, I’ll fall back to that.
That means the next thing I have to do is find shortcodes in my text. I can’t think of a better alternative than a gnarly regular expression. Regular expressions allow you to define a text pattern to match against another string. Think of it as a fancy search syntax for text. I’ll try my best to break it down and explain it. Here’s what I landed on:
/- Javascript regular expressions are surrounded by forward slashes. You’ll see one at the beginning and the end. They serve no purpose other than to tell Javascript this is a regular expression.
(^|\s)- The parentheses surrounding this part of the pattern are here to group two alternatives for the first character of the match. The pipe (|) separates the two alternatives. The first character of this match can either be the start of the string we’re searching (indicated by ^; this would match if the shortcode starts at the beginning of the markdown file) or any kind of space character (indicated by \s; this matches a space, a tab, a newline… anything that is a space or is like a space).
\[- When you want to match a character in a regular expression that also serves a special purpose in regular expressions, you need to escape it to indicate you want to match this character literally. You do this with a backslash (\). In this instance, I’m escaping the left square bracket ([) to match that character, since that should be the start of a shortcode. If I didn’t escape this character, the regular expression engine would think I’m starting a character class.
(?!\[)- I don’t want to match if the first left square bracket is followed immediately by another one (like this: [[). This negative lookahead kills the match if it finds that second bracket as the next character. The syntax is (?! followed by the pattern you don’t want to match. Then you close it up with a right paren ()).
(?<shortcode>.*?)- Parentheses have several uses in regular expressions. You’ve already seen two of them above (for grouping alternatives separated by a pip and for lookarounds). Here I’m using them for a capture group. This allows me to easily split out part of the match. I’ve named this one as shortcode. The syntax here is (?<name> where name is the name you want to assign to your capture group. Follow that with the pattern to match – in this case .*? – and close your capture group with a right paren. It’s not necessary to name your capture groups. You can surround anything with parentheses, and a match of the contained pattern will be captured. Captures that aren’t named are instead numbered starting from 1. The pattern here matches any character (with .) repeated any number of times (with *) but as few as possible (?). Matching as few characters as possible is called a non-greedy match and is what will stop our match before we get to the next part of the expression. Otherwise, the .* would just match all characters and eat up everything left in this one capture group.
(\s(?<attributes>.*?))?- Let’s start from the outside and work our way in with this one. This whole thing is surrounded by parens with a question mark at the end. The question mark matches 0 or 1 instance of the pattern. It effectively makes this part of the pattern optional. Next is a space character (\s). Then I have another named capture group. It’s the same as the last one except for the name.
\]- This matches the closing square bracket for the shortcode. Taken together with the previous four segments of the pattern, this matches the left square bracket, the name of the shortcode, a space before some attributes (if the shortcode has them), and the closing bracket.
(?!\()- Another negative lookahead that kills the match if the closing bracket is followed by an open paren. This is because some text surrounded by brackets followed by more text surrounded by parens is either a link or an image in markdown. It’s probably not a shortcode.
(?<contents>[^\[]*)?- Just like HTML tags, some shortcodes are single sided (like [youtube https://www.youtube.com/watch?v=WVbQ-oro7FQ]) while some are two-sided (like the one I found in my markdown above). Also like HTML, the two-sided ones can have content between. This capture group grabs the contents between two sides of a shortcode. The pattern I use for that is [^\[]*. The brackets define a character class. The caret (^) negates the character class (a class that matches any character except the ones defined in the class). This character class will match any character which isn’t a left square bracket, since that would indicate the closing of the shortcode. The * matches as many of those characters as it finds. I close that capture group with the closing paren and make the whole thing optional.
(\[\/\k<shortcode>\])?- Here’s another optional group. This one contains a left square bracket followed by a forward slash (/) which, like the square bracket, also needs escaping with a backslash (\). The next section \k<shortcode> means that the contents of the group we captured before as shortcode should also appear here. After that, we’re looking for the closing bracket, and we’re done!
g- Note this g is after the forward slash closing the regular expression. It’s called a flag. Flags change the default behavior of a regular expression. Each flag is a single character, and you can add as many as you want to each regular expression. (That link should give you a list of flags and what each one does.) The g makes this regular expression global. Without this, it can only match a single shortcode per node. Each node should be able to have as many shortcodes as it needs, so making this regular expression global allows me to match and handle all of those.
Now I should be able to find all the shortcodes in each article’s text. Here’s what the plugin’s index.js looks like now:
Time to test it out. I need to check the text node’s value to see if it has a shortcode match. If it does, then I need to do… something. Still not quite sure what.
I need to make a decision about what to do here based on what the regular expression finds, and that often means an if statement. There are two outcomes I care about: the regular expression is matched and my plugin needs to take some further action, or the regular expression isn’t matched and the plugin shouldn’t do anything. When that’s the case, I like to start by testing for the case where I don’t want to do anything, and returning out of the function. Here’s what that would look like here:
if (shortcodeRegex.test(node.value)) { return;}
Regular expressions have a test method that checks for a match and just returns true or false depending on whether it finds one. You pass it the string you want to test against. visit from unist-util-visit passes each node of the type I specified into my callback function. I’m capturing that with the parameter name node in my callback function, and that node will have a value property which contains just what you’d expect. Here it’s going to be the value of each text node.
By testing that against my regular expression, I’m checking to see if this text node has a shortcode in it. if it doesn’t, the plugin is done, so I can just return out of it. The cool thing is, for the rest of the code in my callback, I can assume I do have a shortcode. If I didn’t, the function would have already returned.
I still need to see what those escaped shortcodes look like in the AST. I suspect they’re going to retain the escaping and I’ll need to get rid of it in my source files, but this will let me know for sure. Like I said before, ultimately the plugin will replace the shortcode with something more useful, but for now I just want to see that what I’ve written so far is working. To do that, I’ll get my shortcode matches, iterate through them, and log out each shortcode I find.
The other issue you can see in the image above, besides the incorrect aspect ratio, is just below the video.
This is a shortcode. If you’re familiar with WordPress, you probably understand what that means and can skip the rest of this paragraph. The plugin will replace them when the post is rendered with some other content.
The shortcode is for a plugin called Thrive Leads that makes it easy to make forms. It connects up to my email service provider (Drip) so that anyone who fills the form is added to my email list. I have created different forms within Thrive Leads for different offers. I add a form to each article so readers always have a way to “level up” their connection with me. I try to make that offer helpful to most people who would be reading that article.
I’m probably going to lose my quick form builder in the move from WordPress. I’ve seen services that offer something similar for Gatsby, but those are separate services that charge subscription fees. I’m looking to remove those kinds of external dependencies where I can, and it’s not worth breaking with that principal here.
Instead, I can manually build React form components for these Thrive forms. If I identify the components using the same IDs the Thrive forms had on WordPress, I can use the existing short codes to look up the correct forms and place them on the pages.
In order to do any of this, though, I’m going to need a way to replace the shortcodes with something else. Since MDX supports Remark plugins, a Remark transformer plugin seems like a great tool for that job.
I’m following an article in Gatsby’s docs on how to create a Remark transformer plugin. I’ll start by creating a plugins directory in my site. They don’t specify where, so I assume they want it at the root of the project. (Ultimately, it doesn’t matter, but I want to follow the tutorial pretty closely.) I’ll do it from my Mac’s command line with mkdir plugins from the root. The, I’ll switch into that directory via cd plugins.
They don’t say to create a nested directory inside that for this specific plugin, but I think that was their intent. I’ll go ahead and do that with mkdir gatsby-remark-wp-style-shortcodes and change into that with cd gatsby-remark-wp-style-shortcodes.
They want a package.json here which I can get by running npm init and answering the project initiation question. I’m going to stick with the defaults for all of the answers in the questionnaire. I’m not sure I’ll ever split this plugin out and distribute it apart from the site, but if I do, I can always edit the package.json by hand to make any changes I need. That gets me up and running quickly. Once all the questions are answered, I’ll type yes to generate the package.json.
I need a place for my code. That’s going to be a file named index.js inside this new plugin directory. I’ll rip some starter code straight out of the documentation page:
The markdownAST key I’m destructuring out of the first argument is an object representing the markdown document (the abstract syntax tree). That’s what I will traverse to find all of the shortcodes. pluginOptions contains any options that are set in the gatsby-config.js. (If you recall, I have to configure any Remark plugins inside the gatsby-config.js just like I did before with the embedder plugin.) Speaking of configuring, I’ll go ahead and add the plugin to gatsby-config.js so that the markdown gets processed by it:
Before I move forward coding my plugin, I need to see what this AST actually looks like for a real article. To do this, I’m going to temporarily move all the articles except for one out of the articles directory so that I don’t get buried in output when I log out this AST. I’ll keep using the same one I’ve been experimenting on. Then, I’ll do this in my plugin’s index.js:
The last object inside the gatsbyRemarkPlugins array is the configuration for this plugin. Now, when I run npm run develop, I’ll get the object that is the AST of my one remaining article logged out to the console.
Digging through that output, here’s the relevant part:
This represents the shortcode I showed at the start. I added some text in front and behind it so I could see what that would look like in the AST. (I want to be able to match it, even surrounded by regular text.)
You can see that the shortcode is parsed and exposed in the AST as a linkReference. I have to be careful how I handle this, because if I just go through replacing every linkReference, I could end up replacing something that should actually be a real-deal linkReference.
Here’s the approach I’ve decided on for this plugin. The plugin is for replacing shortcodes in general, not any specific shortcode. I’d like the user to be able to define their own functions to generate the new content to replace any shortcodes they may have. The plugin will call the user-provided generator functions to generate the new output.
To achieve this, I’ll have the user pass their replacer functions into the plugin via the plugin’s options. They can send in an object where the keys are the names of the shortcodes they want to replace and the functions will output the replacement for that shortcode. Here’s what configuring this for my first shortcode would look like (in gatsby-config.js):
          {
            resolve: require.resolve('./plugins/gatsby-remark-wp-style-shortcodes'),
            options: {
              replacers: {
                'thrive_2step': (shortcode, attributes, contents) => {
                  // Do some stuff to generate new output
                  // Return the output
                }
              }
            }
          },
This is the same configuration I showed before, but with the new options object containing the nested replacers object. My idea is that I’ll check the name of the shortcode (pulled from the identifier of the linkReference) against the replacers object. If there’s a matching key in replacers, I’ll call that function and replace in the AST with a new HTML node containing whatever the replacer function returned. If there’s no matching replacer, I’ll leave that linkReference alone and move on to the next one.
To implement this, I need to traverse the AST looking for linkReference nodes. Gatsby recommends installing unist-util-visit to traverse the AST. Unfortunately, it isn’t quite that simple. (Is it ever? 😉) The latest version of this package is an ESM module, meaning it can only be brought into your project via import. That’s generally fine, but my project is a CommonJS project since that’s what Gatsby boostrapped for me. That means I import things with require instead. I could change my project to an ESM project, but that breaks everything I already have and I’m not interested in wasting time figuring out why. Instead, I’ll just use an older version of this package that supports CommonJS. I’m sure it will have all the features I need.
I’ll do that with npm install --save unist-util-visit@2.0.3 inside this plugin’s directory. 2.0.3 is the latest version that I then need to import it inside index.js. Then I need to add this at the top of my plugin’s index.js:
const visit = require('unist-util-visit');
and I’ll copy/paste the usage example out of the article, but I’ll go ahead and modify it to traverse for linkReference nodes since I know that’s what I’ll need to look for. I’m also going to capture two additional arguments unist-util-visit passes into my callback function by naming parameters for them. In addition to the node, the library will also pass in the node’s index and the node’s parent. I need that parent because I might have to replace a couple of nodes in order to get the entire shortcode. Here’s what the whole file looks like now:
First tried node = newNode, but this doesn’t work because that doesn’t change the value in the parent’s children array.
This is the value that is referenced in the AST. Without changing it, the AST is the same.
Can instead set parent.children[index] = newNode to change the AST
Write replacer
Picked one of my shortcodes and wrote a simple replacer that returned an empty string. This will effectively delete the shortcode from the final output.
Shortcomings
What if the user has not provided a replacer for this shortcode?
Can’t assume the user has done so
Need to do something besides letting the script throw an exception. This would be hard to understand for the user.
Test for the replacer and throw our own custom error if it doesn’t exist instead. Give the user clear information about what went wrong.
What if the shortcode has a closing tag?
If so, the entire thing – opening shortcode tag, contents, and closing shortcode tag – should be replaced by the replacer
Replacer might need the contents passed to it too since that would probably influence the value you want to use to replace it
If I find a shortcode, go to the parent and look through the rest of the children for a closing shortcode tag (i.e., [/shortcode_name])
If I find a closing shortcode, slice the children array to get the objects between the opening and closing. This array represents the contents of the shortcode. It could be an empty array or an array with any number of other objects.
This will also change how the replacement works. If I find a closing tag, I need to replace everything from the opening to the closing shortcode tag, inclusive, with the value returned from the replacer. Do this by assigning children a new array, with all the existing values up to the shortcode opening tag, the new replacement node, and every value in the children after the closing shortcode tag.
What if I want to run the same replacer for every shortcode?
Add the ability to define a catch-all
When looking for the shortcode replacer, first check for a key matching the shortcode name. If that doesn’t exist, check for a key '*'.
Call whichever one you find or throw an exception if you have neither.
I will now update the key on my shortcode to replace every shortcode on the site with an empty string
It doesn’t work
After writing all this, I ran it and none of the shortcodes were replaced
Found this was because the shortcodes were escaped in my markdown so that the shortcode was being rendered to the page. (e.g., instead of the markdown containing [thrive_leads id=337], it contained \[thrive_leads id=337\]). The plugin wasn’t finding these so they weren’t being replaced.
To fix, I used find/replace to replace all instances in my markdown files
Might have been a fancier way to do this, but this was easier.
- Might also want to add some media queries to maintain the composition across viewports
  ```css
@media screen and (min-width: 35em) {
  .landing-page-body footer::before {
    width: 150%;
  }
}
@media screen and (min-width: 65em) {
  .landing-page-body footer::before {
    width: 100%;
  }
}
This looks like a mess, but that’s to be expected at this point. First, I don’t have any styling in place. Second, none of the images are exposed to Gatsby yet. Third, WordPress replaces emojis with images of the emojis hosted on their servers. That’s the only image that’s working because it’s referencing the path to that emoji hosted by WordPress themselves. That’s why you’re seeing one broken image and the one giant emoji image.